Ra1nUSB
Ra1nUSB is a Windows based iOS 13 – iOS 13.3 Jailbreak method. Ra1nUSB is a Windows Alternative for Checkrain. Checkra1n is only supported for Mac. However, you cannot install the tool directly on Windows. Follow the below guide to Jailbreak using Ra1nUSB. You must have a USB drive for this method.
However, it is popular as Unc0ver, Hexxa Plus or Checkra1n for iOS 13 – iOS 13.7 Jailbreak.
Download Ra1nUSB
Ra1nUSB download is available according to your PC model.
Ra1nUSB for Intel link below
https://drive.google.com/file/d/151GzUsbL4bV5sWZL4D8OoVDtyKbzFjBH/view
Ra1nUSB for AMD link below
https://drive.google.com/file/d/1-R5eXatTFnhw3ObBJb5RTYn_PhXxUPYn/view
Step Guide for Ra1nUSB
Step 01 – First, download the Ra1nUSB according to your PC using the above download buttons.
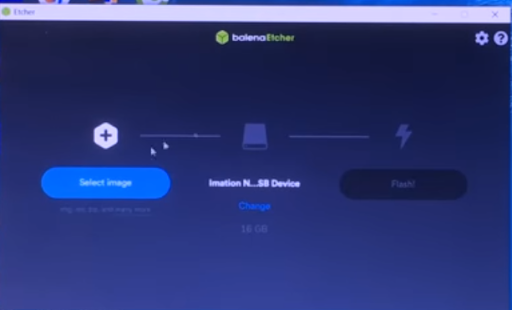
Step 02 – Then download and install balenaEtcher to create your bootable USB. Connect the USB drive to the PC and open the app. It will detect your USB drive and select the downloaded Ra1nUSB file when prompted to “select image” box.
Step 03 – When the process is complete, Go to your computer BIOS files by rebooting. Then disable the VT-D, EL SerialPort, SecureBoot, Stack Network, Fastboot, Wake on LAN and exit BIOS screen. Enable the Virtualization option and save the changes you have done.
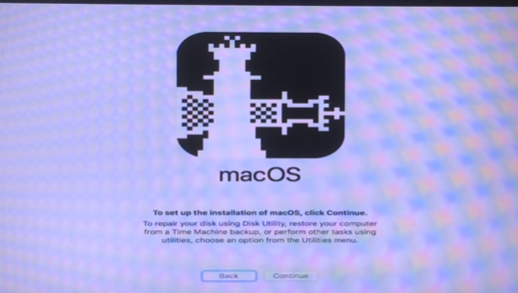
Step 04 – Now Boot your computer again from the USB. Select the Boot macOS Install from Ra1nUSB option. Then the process starts. Choose Boot Verbose from Ra1nUSB. Wait for the image to boot onto your computer. (If you get an error you need to go back to the BIOS again and repeat the process) Once Ra1nUSB boots, it offers the macOS installer screen.
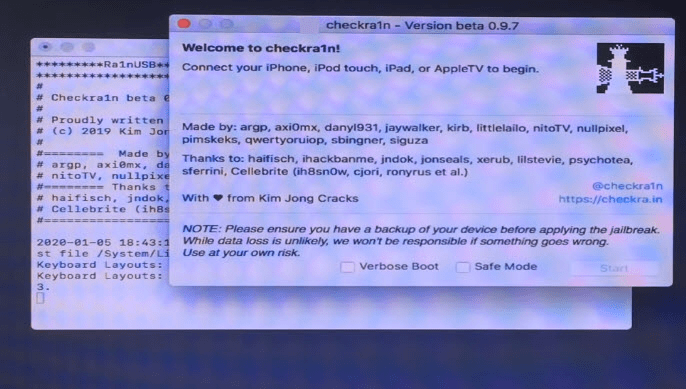
Step 05 – Go to the top and tap Utilities > Terminal. Type in ra1nusb and tap the Enter button from the terminal window.
Step 06 – Now Checkra1n jailbreak screen should open. Then connect your device to the computer. Go ahead with the Checkra1n installation MAC OS guide.
Ra1nUSB compatibility
iOS versions
iOS 13.3, iOS 13.2.3, iOS 13.2.2, iOS 13.2, iOS 13.1.3, iOS 13.1.2, iOS 13.1.1, iOS 13.1, iOS 13, iOS 12.5.5, iOS 12.5.4, iOS 12.5.3, iOS 12.5.2, iOS 12.5.1, iOS 12.5, iOS 12.4.9, iOS 12.4.8, iOS 12.4.7, iOS 12.4.6, iOS 12.4.5, iOS 12.4.4, iOS 12.4.3, iOS 12.4.2, iOS 12.4.1, iOS 12.4, iOS 12.3.2, iOS 12.3.1, iOS 12.3
Note – We don’t have any information about iOS 13.3.1 – iOS 13.7 versions. We could not try on these versions with RainUSB. It might work with these versions too.
Also, it has other jailbreak solutions for iOS 14 – iOS 14.8.1 & iOS 15 – iOS 15.8.8, iOS 16 – iOS 16.7.16, iOS 17 – iOS 17.7.7, iOS 18 – iOS 18.7.9 & iOS 26-iOS 26.5 too. Visit the iOS 26 Jailbreak or iOS 18 Jailbreak pages.
Device models
iPhone 6, iPhone 6 Plus, iPhone 6S, iPhone 6S Plus, iPhone SE, iPhone 7, iPhone 7 Plus, iPhone 8, iPhone 8 Plus, iPhone X , iPad 2 , iPad Mini (1st gen), iPad (3rd gen), iPad (4th gen), iPad mini 4, iPad Pro (12.9 in.) 1st gen, iPad 2018 (6th gen), iPad 2019, (7th gen), iPad Pro 10.5″ (2017) , iPad Pro 12.9″ 2nd Gen (2017), iPod Touch (5th Gen)
Ra1nUSB errors
- ra1nusb Apple logo Stuck
This is the most common error. After doing all the Ra1nUSB setup & when booting it kept showing the apple logo without going anywhere.
How to fix –
Go to your bios settings. Disable the EL SerialPort , SecureBoot, Stack Network, Fastboot
Wake on LAN. Enable virtualization, save and exit bios. Then go to options > graphics injector > untick graphics inject in ra1nusb boot menu. Now retry booting rainusb. (If this doesn’t work, use a different pc)Here is a video tutorial to fix this error by Just a Tech youtube channel. However, this language is different.
- Still waiting for root device
Root device error is another common error for Ra1nUSB. If you are stuck on this error follow the below instructions.
How to Fix –
You should go to options before booting. config and select ‘config-check’ as your config file. Afterwards boot from usb (UEFI) and voila.
- ACPI error
You will get an ACPI error when not recognizing Nvidia graphics cards. With the following methods you can get Ra1nUSB working on most custom PCs.
How to fix –
Go to the clover menu when bootup, then go to options. You can enter any of the following commands in the boot arguments section. Add -v in front of any of these for verbose boot.
- npci=0x3000
- npci=0x2000
- UseKernelCache=No npci=0x20000 -f
- PCIRootUID=1 npci=0x2000
- -x -graphicsenabler=yes
- ra1nusb error 20
Error -20 is another common error encountered during the Ra1nUSB process.
How to fix –
Select the jailbreak button with safe mode. With this method, tweaks will not run. Go to Cydia, remove the bug fix and shut down the jailbreak tweak again to run.
- ra1nusb black screen /Error 31/20 Mouse/Keyboard/Boot Failed
These are other errors. All these errors are fixed with AMD File. Checkout this video tutorial by Apple Tag.